In the spirit of Earth day, students design and create upcycled products using materials collected at home and school.

Recycling is good, but upcycling is better! Recycling is turning what we normally throw away into something we can use again either, in its current form or as something else. Upcycling is taking something we normally recycle and transforming it into something more valuable.
We create too much waste, and upcycling is a fun way to reduce the amount of garbage we generate. In this project, students will create upcycled items for their own use, to give as gifts, or to sell as a fundraiser for a conservation or community organization.
The enormity of some environment issues, like clean air and renewable energy, make it hard for young students to understand how to take specific action. Recycling, on the other hand, is “old-hat” to today’s students who have grown up recycling and have known the difference between the garbage can and recycling bin since preschool.
Introduce your students to the difference between recycling and upcycling. Recycling is taking an item and using the materials in it again. For example, when plastic bottles are recycled into stuffing for winter jackets.
Upcycling involves reusing an item in such a way that its value is increased. Students may have seen upcycling examples like wallets made from candy wrappers or rag rugs made from cast-off fabric scraps.

Ask your students if they know of any other items that have been upcycled. If they are having trouble coming up with ideas, you can explore some examples of upcycling online, but the goal of this project is to use design thinking methods in a maker space environment to design their own.
If students need additional exposure to concepts of recycling, start the unit by sharing and discussing the time it takes for garbage to decompose in the environment.
Let students know they will be creating their own upcycled items to use personally, to give as gifts, or to sell to raise funds for a conservation group or community organization.
Before students can begin creating, you need to collect materials and design a space where students can work.
Work with your students to create a list of items they can find at home that they may be able to use in their designs. For example:
The used items students find must be clean. It can take some time to collect materials, so consider sharing a list of basic items with families a week or two in advance. Once you start discussions with students, they will think of additional ideas of things to bring, but you will have a good set of materials to start with.
“Have nothing in your house that you do not know to be useful, or believe to be beautiful.” - William Morris
In addition to needing space to store the materials, you need to think about adequate production space. Some schools are fortunate enough to have a Maker Space, but just about any space, such as a multipurpose room, an unused classroom, or even a hallway will work as your temporary Maker headquarters.
You will need supplies to support your designers. Basic tools like paper, pencils, rulers, tape, paint, and scissors are available at almost any school. If possible, supplement these supplies with items they may not have used before, like wire, Mod Podge, sewing needles and other fasteners, twine, yarn, and ribbons. Be sure to discuss safety when using new tools and adhesives.
Form small design teams of 4-5 students. Remind teams that their task is to design a product from items that would otherwise end up in the trash or recycling.
You might encourage them to consider designing a specific type of object, like a toy or decorative item, or have them start by thinking of a person they’d like to make a gift for, such as a friend or parent.

Teams should begin by brainstorming. Don’t limit the brainstorming process to thinking, talking, and list making! Teams can also brainstorm by collecting objects they think are interesting and combining them to see what happens. As they begin playing with objects and materials, team members can contribute new ideas and move in new and different directions. Encourage teams, or individual team members, to observe the design process of other teams for inspiration.
Once teams have an idea of what to make, they have some latitude in how to proceed. They can work together to make the object functional and beautiful. If their design is straightforward, have students consider making a prototype as a team and then individually making different variations of the object.
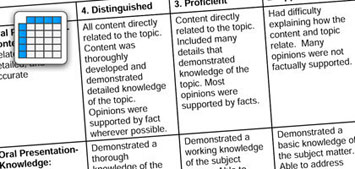
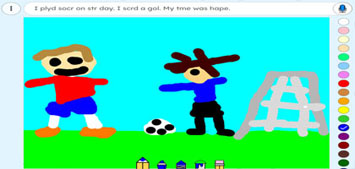
Many students have used YouTube how-to videos for Minecraft or rubber band bracelets. Have students use Wixie to write and illustrate how-to instructions for their design to provide others with the information necessary to start upcycling on their own! You can share the URLs for their work, print QR codes to display near the products, or print the instructions for offline use.
Host a gallery walk as teams are finishing up their upcycled designs. As a class, discuss ways you might sort and group objects together for display. Consider how you will display objects so that people can see them. Determine how people will pay for items. For example, you can showcase items as if they were at a store or hold a silent auction.
Consider too how you will promote the upcycle fair and advertise the students’ products.
It’s better for the Earth if more people upcycle. How can you encourage more people to start upcycling?
Outline the tasks you have identified as essential for hosting your own product fair. Form new teams to tackle these tasks. This allows students to self-select tasks they are interested in. If you haven’t already, this is a great opportunity to get students’ families involved.
Tasks might include:
Moving beyond making for making’s sake can be an involved process. Consider having a team of students, either from your class or from a technology class, document the entire process using video or as a web site. This is a great authentic opportunity to begin blogging!
Host an upcycle fair to show off student work and raise funds for a community or conservation organization chosen by students. In addition to inviting parents, send invitations explaining when and where other students and community members can shop as well.
This connection to an audience beyond teachers and parents helps students see that their efforts are valuable (especially since they are making money) and will incentivize them to develop quality products.
You will want to advertise the upcycled products students have created. While you can display them around school and share photos with parents, this is also a great opportunity to have students develop ads to persuade others to buy their products. Students may choose to highlight how their products promote conservation, or they may prefer to persuade others to purchase the upcycled creations for their usefulness or beauty.
You might also consider donating student-created items to a local low-income preschool, senior home, or non-profit second-hand store.
Your first discussions about recycling and upcycling will help you gauge students’ understanding of the impact of waste on the environment.
Be sure to include creativity in your evaluation. Are students demonstrating habits of creativity, such as being inquisitive, persistent, imaginative, collaborative, and disciplined?
Do they take risks both creatively and with their team? Do they prefer to follow someone else’s directions? Did they impart their own influences on the items produced? How much effort and creativity did they contribute to create something new/beautiful/valuable?
You can use Wixie to include a reflective component in this process. Ask students to create a Wixie project that includes a definition of upcycling, describes how upcycling is beneficial, showcases their upcycled design and lists the materials that were salvaged, includes an advertisement for their product, and shares what they learned along the way.
Miranda Paul. One Plastic Bag: Isatou Ceesay and the Recycling Woman of the Gambia ISBN: 1467716081
Pam Scheunemann. Trash to Treasure: A Kid’s Guide to Crafts ISBN: 193806318X
Garth Johnson. 1000 Ideas for Creative Reuse: Remake, Restyle, Recycle, Renew ISBN: 1592535402
Hipcycle: 33 boards for #upcycling
Environmental Protection Agency - Reduce, Reuse, Recycle
Conceiving and developing new artistic ideas and work.
Anchor Standard #1. Generate and conceptualize artistic ideas and work.
Anchor Standard #2. Organize and develop artistic ideas and work.
Anchor Standard #3. Refine and complete artistic work.
3-5-ETS1-2. Generate and compare multiple possible solutions to a problem based on how well each is likely to meet the criteria and constraints of the problem.
Writing
Text Type and Purpose
3. Write narratives to develop real or imagined experiences or events using effective technique, descriptive details, and clear event sequences.
a. Establish a situation and introduce a narrator and/or characters; organize an event sequence that unfolds naturally.
Speaking and Listening
Presentation of Knowledge and Ideas
4. Report on a topic or text, tell a story, or recount an experience with appropriate facts and relevant, descriptive details, speaking clearly at an understandable pace.
6. Creative Communicator
Students communicate clearly and express themselves creatively for a variety of purposes using the platforms, tools, styles, formats and digital media appropriate to their goals. Students:
a. choose the appropriate platforms and tools for meeting the desired objectives of their creation or communication.
b. create original works or responsibly repurpose or remix digital resources into new creations.
c. communicate complex ideas clearly and effectively by creating or using a variety of digital objects such as visualizations, models or simulations.
d. publish or present content that customizes the message and medium for their intended audiences.
Get creative classroom ideas delivered straight to your inbox once a month.

Follow us on Instagram for daily inspiration
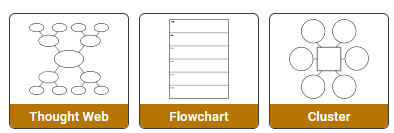
Create a thought web, cluster, flowchart, or other graphic organizer for a lesson

Five ideas for creative classroom centers
Creative, digital book reviews
Fun and powerful ideas with animated characters
Wixie
Share your ideas, imagination, and understanding through writing, art, voice, and video.
Rubric Maker
Create custom rubrics for your classroom.

Pics4Learning
A curated, copyright-friendly image library that is safe and free for education.
Wriddle
Write, record, and illustrate a sentence.
Get creative classroom ideas delivered straight to your inbox once a month.
Topics